
1. Introduction
The Importance of Firewalls in Ubuntu
Any system connected to the internet is exposed to potential risks, including unauthorized access from external sources. A firewall is essential to protect your system from such threats. Ubuntu comes with a user-friendly firewall tool called UFW (Uncomplicated Firewall), which provides strong security with simple operations. This article explains the necessary steps — from installing and configuring UFW to checking its status and troubleshooting issues. Use this guide to easily configure your firewall and strengthen the security of your Ubuntu system, even if you are a beginner.
2. Ubuntu Firewall Tool: What Is UFW?
Overview and Benefits of UFW
UFW, short for “Uncomplicated Firewall,” enables users to configure firewall settings with straightforward commands. It is designed for Ubuntu and other Debian-based systems, making it easy to use even for those unfamiliar with the command line. Although advanced users may prefer the traditional iptables firewall for detailed configurations, UFW simplifies the process and enables efficient security management without complexity.
Main Advantages of UFW
- Simple commands: Manage firewall rules with short, easy-to-remember commands — ideal for beginners.
- Secure defaults: Blocks incoming traffic and allows outgoing traffic by default, making it ready to use immediately.
- Flexible configuration: Create custom rules for ports, IP addresses, or entire networks.
3. Installing and Configuring UFW
How to Install UFW
UFW is usually pre-installed on Ubuntu. If it is not available on your system, install it with the following commands:
sudo apt update
sudo apt install ufw
Enabling and Disabling UFW
Once UFW is enabled, all incoming traffic is blocked by default, while outbound traffic is permitted. Use the commands below to enable or disable UFW.
- Enable UFW:
sudo ufw enableExample output:
Firewall is active and enabled on system startup- Disable UFW:
sudo ufw disableConfiguring Default Policies
To properly secure your system, configure UFW’s default policies. Use the commands below to block incoming traffic and allow outgoing traffic:
- Deny incoming traffic (block):
sudo ufw default deny incoming- Allow outgoing traffic:
sudo ufw default allow outgoingThis configuration creates a secure environment by blocking unnecessary access while allowing internal communication.
4. Checking UFW Status
Viewing UFW Status and Rules
To check the current status of UFW and review all rules applied, run:
sudo ufw status verboseExample output:
Status: active
Logging: on (low)
Default: deny (incoming), allow (outgoing)
New profiles: skip
This output shows the current firewall status, logging details, default policies, and applied rules.
5. Configuring UFW Rules
Recommended Essential Rules
As part of basic security practices, allow access to the following essential ports:
- Allow HTTP (port 80) and HTTPS (port 443):
  sudo ufw allow 80/tcp
sudo ufw allow 443/tcp- Allow SSH (port 22): Required for secure remote access.
sudo ufw allow 22/tcpControlling Access from Specific IP Addresses and Networks
- Allow SSH access from a specific IP address:
sudo ufw allow from 192.168.1.100 to any port 22- Allow access from a network range:
sudo ufw allow from 192.168.1.0/24This enables secure access from trusted IPs or networks while restricting unnecessary connections.

6. Managing UFW Logs
Enabling Logging and Log Levels
UFW logging helps track successful and blocked access attempts, enabling you to detect suspicious activities. Logs are stored in the /var/log directory.
- Enable logging:
sudo ufw logging on- Set log level (high recommended):
sudo ufw logging highViewing Logs
To monitor logs in real time, use:
sudo tail -f /var/log/syslogIf suspicious access attempts are detected, block the related IP addresses to improve security.
7. UFW GUI Tool: Introduction to Gufw
Installing and Using Gufw
For users uncomfortable with command-line operations, Gufw — the graphical interface for UFW — is recommended. Gufw allows intuitive rule management and log viewing.
- Install:
sudo apt install gufw- Configuring rules: Launch Gufw and use the “Rules” tab to allow or deny specific ports. For example, you can easily allow HTTP, HTTPS, and SSH from the “Preconfigured” list.
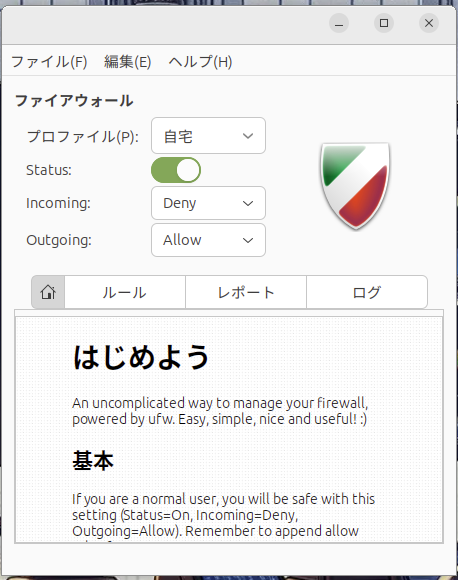
Image: Gufw
8. Troubleshooting
Common Issues and Solutions
- UFW does not activate:
- Reset configurations using
sudo ufw resetand reconfigure the firewall.
- Specific services are blocked:
- Verify that the required ports are allowed. Add missing ports using
sudo ufw allow.
- Gufw does not start:
- Reinstall Gufw or restart the system to resolve startup issues.
9. Conclusion
This article covered everything from UFW basics to recommended configurations and troubleshooting tips for securing Ubuntu systems. By properly configuring your firewall and reviewing rules and logs regularly, you can significantly strengthen system security.
The Importance of Regular Maintenance
Even after configuring UFW, it is essential to periodically review the rules and logs to identify suspicious activities. Security is an ongoing responsibility, and maintaining your firewall helps keep your system safe. Consider the following points:
- Update rules when adding or removing services: Whenever you install new services or remove unused ones, review your firewall rules and make necessary adjustments.
- Monitor logs regularly: Check UFW logs for suspicious access attempts. If certain IP addresses repeatedly trigger denied access, block them proactively.
- Organize rules periodically: Over time, unnecessary rules may accumulate. Cleaning them up improves security and simplifies management.